November 15-16 2022 Virtual (2 Day “Hands-On” Precision Gage Calibration and Repair Training.)
Event Date:
November 15, 2022
Event Time:
9:00 am
Event Location:
Virtual
Join me for a Virtual 2 Day “Hands-On” Precision Gage Calibration and Repair Training. This training will last 14-16 hours and will cover the following goals and topics:
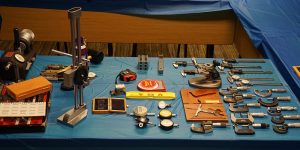
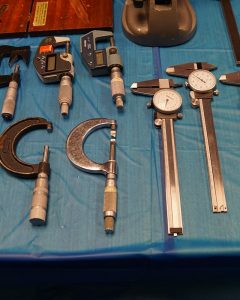
This 2-day online precision gage and repair training offers specialized training in calibration and repair for the individual who has some knowledge of basic Metrology. Approximately 75% of the workshop involves “Hands-on” calibration, repair, and adjustments of micrometers, calipers, indicators height gages, etc. The course also covers NIST Traceability, Certificates of Conformance, Gage Management, Standards, etc.

Each student is encouraged to participate in actual calibrations and repairs. A list of gages used in the class is available from Carlis at iict@msn.com

Goal
- Equip attendees with the knowledge to meet current and future calibration needs
- Leave this class prepared to save your company money on calibrations
- Provide attendees opportunities for personal growth in the Quality Field
TOPICS COVERED IN THIS Virtual Calibration/Repair Training:

- Calibration Requirements Of, ISO 17025, ISO 13485,
ANSI-NCSL Z540-1, 1994, ISO 9001, ISO/TS16949, ISO 10012.
- Definition of Calibration & Traceability.
- Rule of 10 to 1 and 4 to 1.
- Certificate of conformance vs. Certificate of Calibration.
- NIST Test number and Test Date-Traceability.
- Overview of Calibration Terminology.
- Overview of National Standards, Primary Standards, Reference Standards, and Working Standards.
- Calibration labels and stickers.
- Gage Block Usage and Handling.
- Determining Calibration cycle times.
- “Hands-on” Calibration Methods of;
- Micrometers °Calipers °Indicators °Sine bars
- Levels °Thread gages °Pin Gages
- Plug Gages °Squares °Height Gages
- Scales Other Gages as customer requests
- Discussion on Optical Comparators, Surface Plates, Ring Gages, CMMs, etc
- “Hands-on” Repair techniques of Micrometers, Calipers, and Dial Indicators
TOPICS COVERED
- ISO-10012:2003 Related Standards
- Certificate of Conformance vs. Certificate of Analysis
- National Institute of Standards and Technology
- Which Systems Need to Be Calibrated, Controlled, or Verified in a Measurement System
- Qualifications to Calibrate Systems & Document Procedures
- Choosing the Proper Equipment
- Three Elements: Capability, Traceability, Reliability
- Maintaining Traceability
- Why Registration to a Quality Management System Is Not Sufficient
- How Software Affects Your Calibration System
- Using Outside Calibration Services
- Hands-on calibration, repair, and adjustments of Micrometers, Calipers, Indicators, and Height Gages (this comprises approximately 75% of the total class time)
- Gage Calibration requirements of ISO 10012; ISO 17025; ANSI-NCSL Z540-1; ISO 9001:2000 and ISO/TS 16949; ISO 13485
- Definition of Calibration & Traceability
- Rule of 10 to 1 and 4 to 1 in calibration
- Certificate of Conformance vs. Certificate of Calibration
- NIST Test Number and Test Date Traceability
- Overview of Calibration Terminology
- Overview of National Standards, Primary Standards, Reference Standards, and working Standards
- Calibration Labels and stickers
- Gage Block Usage and Handling
- Uncertainty of Measurement
- Contracted calibration
- Training
- Calibration Environmental Conditions
- Record & Record Retention
- Audits-internal & external
- Determining Calibration Cycle times
- “Hands-On” Student participation calibrating and repairing micrometers, calipers, and indicators (not test)
- “Hands-On” Student participation calibrating Thread, Plug, Pin, and Ring Gages; Sine Bars; Levels; V-blocks; Height Gages, other hard gaging as requested
- Discussions and calibrations of CMM, Optical Comparators, Surface Plates, and other equipment as requested
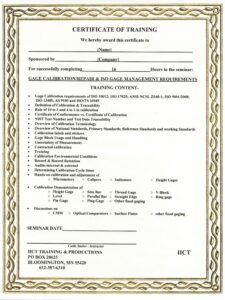
Certificate of Training provided following successful completion of the class.

Goal
As a result of completing this Virtual Calibration/Repair Training, the following goals will be met
- Equip attendees with the knowledge to meet current and future calibration needs
- Leave this class prepared to save your company money on calibrations
- Provide attendees opportunities for personal growth in the Quality Field
CANCELLATION POLICY
In the event that circumstances beyond our control, requires IICT to cancel or postpone a class, IICT cannot be held responsible for canceled airfares, canceled hotels, or any other expenses incurred by the student due to the cancellation of the class. We reserve the right to cancel or reschedule any event, or to change instructors.
-
- Workshop registration fee refunded up to 21 days before workshop less a $100 fee.
- No refunds within 21 days of the workshop. Substitutions are allowed at any time.
- Registrant or substitute from the same company may attend a class at a later date.
LINKS
